Table of Contents
Let’s build a fully-fledged HTTP server from scratch in Go. This course assumes you already have a solid understanding of Go. If you don’t, take a step back and take our Go course.
Caveat: There is a more updated version of this course that’s more interactive over on Boot.dev here. If you’re looking for a more interactive experience, I recommend checking it out!
Goals of this course
- Understand what web servers are and how they power real-world web applications
- Build an actual web server in Go, without the use of a framework
- Learn what makes Go a great language for building fast web servers
- We’ll use production-ready tools for everything in this course except the database. We’ll use flat files because we want to drive home the point that a database is just a fancy way to store data on disk. We’ll cover DBs later.
Servers 🔗
What is a server?
A web server is just a computer that serves data over a network, typically the Internet. Servers run software that listens for incoming requests from clients. When a request is received, the server responds with the requested data.

Any server worth its salt can handle many requests at the same time. In Go, we use a new goroutine for each request to handle them concurrently. Let’s start by practicing with goroutines.
Assignment
In this course, we’ll be working on a product called “Chirpy”. Chirpy is a social network similar to Twitter.
One of Chirpy’s servers is processing requests unbelievably slowly. Use a goroutine to fix the bug in the handleRequests (not handleRequest) function. The server should be able to process all the requests within the time limit.
Goroutines in servers
In Go, goroutines are used to serve many requests at the same time, but not all servers are quite so performant.
Go was built by Google, and one of the purposes of its creation was to power Google’s massive web infrastructure. Go’s goroutines are a great fit for web servers because they’re lighter weight than operating system threads, but still take advantage of multiple cores. Let’s compare a Go web server’s concurrency model to other popular languages and frameworks.
Node.js / Express.js
In JavaScript land, servers are typically single-threaded. A Node.js server (often using the Express framework) only uses one CPU core at a time. It can still handle many requests at once by using an async event loop. That just means whenever a request has to wait on I/O (like to a database), the server puts it on pause and does something else for a bit.
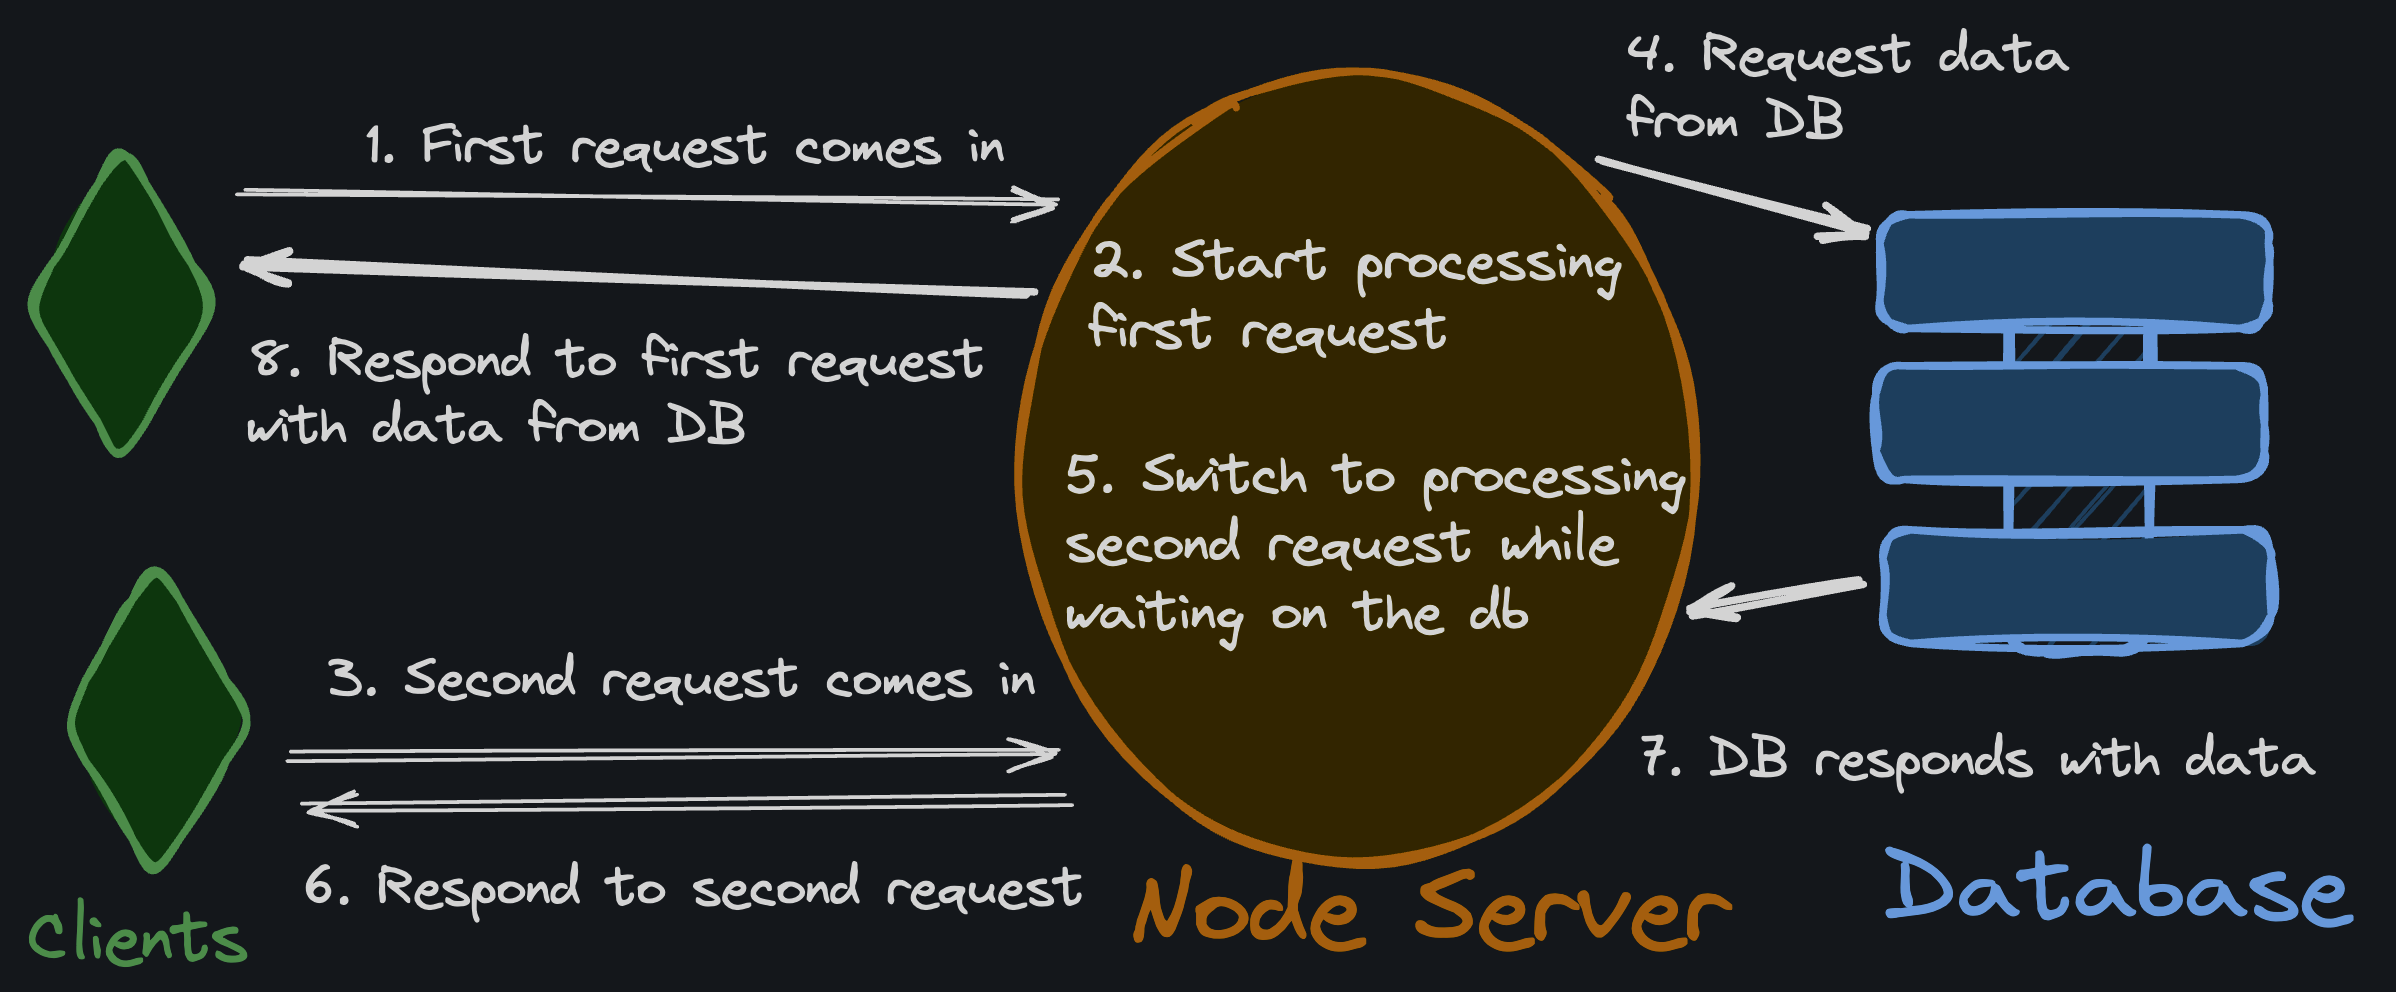
This might sound horribly inefficient, but it’s not too bad. Node servers do just fine with the I/O workloads associated with most CRUD apps (Where processing is offloaded to the Database). You only start to run into trouble with this model when you need your server to do CPU-intensive work.
Python / Django / Flask
Django and Flask are two of the most popular back-end Python frameworks. They’re both built on top of the WSGI standard, which is a specification for how web servers and web applications should communicate.
Generally speaking, Python application code only processes a single request at a time. This means that if a request is being processed, the application won’t do anything else until it’s finished.
The only reason this isn’t completely debilitating is there is a separate WSGI process (for example uwsgi) that handles the concurrency of the application code. It can spawn multiple processes of the Python application to handle different requests at once.
In other words, uwsgi + Flask or uwsgi + Django are both needed to handle the same things that a single Node.js or Go server does alone.
Takeaways
- Go servers are great for performance whether the workload is I/O or CPU-bound
- Node.js and Express work well for I/O-bound tasks, but struggle with CPU-bound tasks
- Python and Django/Flask do just fine with I/O bound tasks, but frankly, no one picks Python for its performance
I’m not saying Go is always “better” than Python or JavaScript when it comes to back-end development, but it generally outperforms them when it comes to speed.
Server and Setup
Starting now, this course is going to be very different than what you’re used to on Boot.dev!
We’re building a fully-fledged web server from scratch on your local machine. You’ll notice that the code to the right is not editable! That’s because that’s just the test suite that will make HTTP requests to your local server over localhost.
Tools you’ll need
- A code editor. I use VS code, but you can use whatever you’re comfortable with.
- A command line. I work on Mac OS/Linux, so my instructions will be in Bash. I recommend WSL 2 if you’re on Windows so you can still use Linux commands.
- The Go toolchain with version
1.22+. - The Boot.dev CLI to run the tests. Go ahead and install it following the instructions in the README, then run
bootdev loginto authenticate.
The lessons in this course require at least version 1.22 of Go. If you’re using an older version, you’ll run into some frustrating issues!
Set up your project
Create a new GitHub/GitLab repository for your Chirpy project, and clone it down onto your local machine. Use go mod init to create a new Go module for the project, and add a main.go file. That’s where you’ll be writing your code for each assignment.
Do not delete your work after each assignment! Each lesson will build upon the previous ones so we’ll be reusing a lot of code.
Assignment
The Go standard library makes it easy to build a simple server. Your task is to build and run a server that binds to localhost:8080 and always responds with a 404 Not Found response.
Steps
- Create a new http.ServeMux
- Create a new http.Server struct.
- Use the new “ServeMux” as the server’s handler
- Set the
.Addrfield to “:8080”
- Use the server’s ListenAndServe method to start the server
- Build and run your server (e.g.
go build -o out && ./out) - Open
http://localhost:8080in your browser. You should see a404error because we haven’t connected any handler logic yet. Don’t worry, that’s what is expected for the tests to pass for now. - While your server is still running, run and submit the HTTP tests using the Boot.dev CLI tool in another terminal window.
Tips
- Use
go mod initto create a Go module for your project - Each time you change your code you’ll need to rebuild and restart your server
- Use Git to save your work as you go
Fileservers
A fileserver is a kind of simple web server that serves static files from the host machine. Fileservers are often used to serve static assets for a website, things like:
- HTML
- CSS
- JavaScript
- Images
Assignment
The Go standard library makes it super easy to build a simple fileserver. Build and run a fileserver that serves a file called index.html from its root at http://localhost:8080. That file should contain this HTML:
<html>
  <body>
    <h1>Welcome to Chirpy</h1>
  </body>
</html>
Steps
- Add the HTML code above to a file called
index.htmlin the same root directory as your server - Use the http.NewServeMux’s .Handle() method to add a handler for the root path (
/). - Use a standard http.FileServer as the handler
- Use http.Dir to convert a filepath (in our case a dot:
.which indicates the current directory) to a directory for thehttp.FileServer. - Re-build and run your server
- Test your server by visiting
http://localhost:8080in your browser - Run the tests using the CLI
Fileserver quiz
Let’s go over some of the code that we used for our simple fileserver and make sure we understand the nuts and bolts.
Consider this code from the main() function and answer the questions:
srv := &http.Server{
    Addr:    ":" + port,
    Handler: mux,
}

log.Printf("Serving files from %s on port: %s\n", filepathRoot, port)
log.Fatal(srv.ListenAndServe())
Serving Images
You may be wondering how the fileserver knew to serve the index.html file to the root of the server. It’s such a common convention on the web to use a file called index.html to serve the webpage for a given path, that the Go standard library’s FileServer does it automatically.
When using a standard fileserver, the path to a file on disk is the same as its URL path. An exception is that index.html is served from / instead of /index.html.
Try it out
Run your chirpy server again, and open http://localhost:8080/index.html in a new browser tab. You’ll notice that you’re redirected to http://localhost:8080/.
This works for all directories, not just the root!
For example:
/index.htmlwill be served from//pages/index.htmlwill be served from/pages/pages/about/index.htmlwill be served from/pages/about
Alternatively, try opening a URL that doesn’t exist, like http://localhost:8080/doesntexist.html. You’ll see that the fileserver returns a 404 error.
Assignment
Let’s serve another type of file from our server: an image. Chirpy has a slick logo, and we need to serve it so that our users can load it in their browsers and mobile apps.
Download the Chirpy logo from below and add it to your project directory.

Configure its filepath so that it’s accessible from this URL:
http://localhost:8080/assets/logo.png
Workflow tips
Servers are interesting because they’re always running. A lot of the code we’ve written in Boot.dev up to this point has acted more like a command line tool: it runs, does its thing, and then exits.
Servers are different. They run forever, waiting for requests to come in, processing them, sending responses, and then waiting for the next request. If they didn’t work this way, websites and apps would be down and unavailable all the time!
Debugging a server
Debugging a CLI app is simple:
- Write some code
- Build and run the code
- See if it did what you expected.
- If it didn’t, add some logging or fix the code, and go back to step 2.
Debugging a server is a little different. The simplest way (minimal tooling) is to:
- Write some code
- Build and run the code
- Send a request to the server using a browser or some other HTTP client
- See if it did what you expected.
- If it didn’t, add some logging or fix the code, and go back to step 2.
Make sure you’re testing your server by hitting endpoints in the browser before submitting your answers.
Restarting a server
I usually use a single command to build and run my servers, assuming I’m in my main package directory:
go run .
This builds the server and runs it in one command.
To stop the server, I use ctrl+c. This sends a signal to the server, telling it to stop. The server then exits.
To start it again, I just run the same command.
CLI tip
If you didn’t know, you can continuously press the up arrow key on the command line to see the commands you’ve previously run. That way you don’t need to retype commands that you use often!
Custom Handlers
In the previous exercise, we used the http.FileServer function, which simply returns a built-in http.Handler.
An http.Handler is just an interface:
type Handler interface {
	ServeHTTP(ResponseWriter, *Request)
}
Any type with a ServeHTTP method that matches the http.HandlerFunc signature above is an http.Handler. Take a second to think about it: it makes a lot of sense! To handle an incoming HTTP request, all a function needs is a way to write a response and the request itself.
Assignment
Let’s add a readiness endpoint to the Chirpy server! Readiness endpoints are commonly used by external systems to check if our server is ready to receive traffic.
The endpoint should be accessible at the /healthz path using any HTTP method.
The endpoint should simply return a 200 OK status code indicating that it has started up successfully and is listening for traffic. The endpoint should return a Content-Type: text/plain; charset=utf-8 header, and the body will contain a message that simply says “OK” (the text associated with the 200 status code).
Later this endpoint can be enhanced to return a 503 Service Unavailable status code if the server is not ready.
1. Add the readiness endpoint
I recommend using the mux.HandleFunc to register your handler. Your handler can just be a function that matches the signature of http.HandlerFunc:
handler func(http.ResponseWriter, *http.Request)
Your handler should do the following:
- Write the
Content-Typeheader - Write the status code using w.WriteHeader
- Write the body text using w.Write
2. Update the fileserver path
Now that we’ve added a new handler, we don’t want potential conflicts with the fileserver handler. Update the fileserver to use the /app/ path instead of /.
Not only will you need to mux.Handle the /app/ path, you’ll also need to strip the /app prefix from the request path before passing it to the fileserver handler. You can do this using the http.StripPrefix function.
Handler Review
Handler
An http.Handler is any defined type that implements the set of methods defined by the Handler interface, specifically the ServeHTTP method.
type Handler interface {
	ServeHTTP(ResponseWriter, *Request)
}
The ServeMux you used in the previous exercise is an http.Handler.
You will typically use a Handler for more complex use cases, such as when you want to implement a custom router, middleware, or other custom logic.
HandlerFunc
type HandlerFunc func(ResponseWriter, *Request)
You’ll typically use a HandlerFunc when you want to implement a simple handler. The HandlerFunc type is just a function that matches the ServeHTTP signature above.
Why this signature?
The Request argument is fairly obvious: it contains all the information about the incoming request, such as the HTTP method, path, headers, and body.
The ResponseWriter is less intuitive in my opinion. The response is an argument, not a return type. Instead of returning a value all at once from the handler function, we write the response to the ResponseWriter.
Routing 🔗
Stateful Handlers
It’s frequently useful to have a way to store and access state in our handlers. For example, we might want to keep track of the number of requests we’ve received, or we may want to pass around an open connection to a database, or credentials to an API.
Assignment
The product managers at Chirpy want to know how many requests are being made to serve our homepage - in essence, they want to know how many people are viewing the site!
They have asked for a simple HTTP endpoint they can hit to get the number of requests that have been processed. It will return the count as plain text in the response body.
For now, they just want the number of requests that have been processed since the last time the server was started, we don’t need to worry about saving the data between restarts.
Steps
- Create a struct that will hold any stateful, in-memory data we’ll need to keep track of. In our case, we just need to keep track of the number of requests we’ve received.
type apiConfig struct {
	fileserverHits int
}
- Next, write a new middleware method on a
*apiConfigthat increments thefileserverHitscounter every time it’s called. Here’s the method signature I used:
func (cfg *apiConfig) middlewareMetricsInc(next http.Handler) http.Handler {
	// ...
}
- Wrap the
http.FileServerhandler with the middleware method we just wrote. For example:
mux.Handle("/app/", apiCfg.middlewareMetricsInc(handler))
- Create a new handler that writes the number of requests that have been counted as plain text in this format to the HTTP response:
Hits: x
Where x is the number of requests that have been processed. This handler should be a method on the *apiConfig struct so that it can access the fileserverHits data.
Register that handler with the serve mux on the
/metricspath.Finally, create and register a handler on the
/resetpath that, when hit, will reset yourfileserverHitsback to0.
It should follow the same design as the previous handlers.
Remember, similar to the metrics endpoint, /reset will need to be a method on the *apiConfig struct so that it can also access the fileserverHits
Middleware
Middleware is a way to wrap a handler with additional functionality. It is a common pattern in web applications that allows us to write DRY code. For example, we can write a middleware that logs every request to the server. We can then wrap our handler with this middleware and every request will be logged without us having to write the logging code in every handler.
Here are examples of the middleware that we’ve written so far.
Keeping track of the number of times a handler has been called
func (cfg *apiConfig) middlewareMetricsInc(next http.Handler) http.Handler {
	return http.HandlerFunc(func(w http.ResponseWriter, r *http.Request) {
		cfg.fileserverHits++
		next.ServeHTTP(w, r)
	})
}
Logging every request
We haven’t written this one yet, but it would look something like this:
func middlewareLog(next http.Handler) http.Handler {
	return http.HandlerFunc(func(w http.ResponseWriter, r *http.Request) {
		log.Printf("%s %s", r.Method, r.URL.Path)
		next.ServeHTTP(w, r)
	})
}
Routing
The Go standard library has a lot of powerful HTTP features and, as of version 1.22, comes equipped with method-based pattern matching for routing.
Note that there are other powerful routing libraries like Gorilla Mux and Chi, however, the instructions for this course will assume you are using Go’s standard library. Just know that it isn’t your only option!
In this lesson, we are going to limit which endpoints are available via which HTTP methods. In our current implementation, we can use any HTTP method to access any endpoint. This is not ideal.
Try it!
Run this command to send an empty POST request to your running server:
curl -X POST http://localhost:8080/healthz
You should get an OK response - but we want this endpoint to only be available via GET requests.
Assignment
Add explicit HTTP methods to our current 2 custom endpoints to only allow for GET methods.
/healthz/metrics
In general, a pattern looks something like this: [METHOD ][HOST]/[PATH]
Here are some examples:
mux.HandleFunc("POST /articles", handlerArticlesCreate)
mux.HandleFunc("DELETE /articles", handlerArticlesDelete)
When a request is made to one of these endpoints with a method other than GET, the server should return a 405 (Method Not Allowed) response (this is handled automatically!).
Patterns
A pattern is a string that specifies the set of URL paths that should be matched to handle HTTP requests. Go’s ServeMux router uses these patterns to dispatch requests to the appropriate handler functions based on the URL path of the request. As we saw in the previous lesson, patterns help organize the handling of different routes efficiently.
As previously mentioned, patterns generally look like this: [METHOD ][HOST]/[PATH]. Note that all three parts are optional.
Rules and Definitions
Fixed URL Paths
A pattern that exactly matches the URL path. For example, if you have a pattern /about, it will match the URL path /about and no other paths.
Subtree Paths
If a pattern ends with a slash /, it matches all URL paths that have the same prefix. For example, a pattern /images/ matches /images/, /images/logo.png, and /images/css/style.css. As we saw with our /app/ path, this is useful for serving a directory of static files or for structuring your application into sub-sections.
Longest Match Wins
If more than one pattern matches a request path, the longest match is chosen. This allows more specific handlers to override more general ones. For example, if you have patterns / (root) and /images/, and the request path is /images/logo.png, the /images/ handler will be used because it’s the longest match.
Host-specific Patterns
We won’t be using this but be aware that patterns can also start with a hostname (e.g., www.example.com/). This allows you to serve different content based on the Host header of the request. If both host-specific and non-host-specific patterns match, the host-specific pattern takes precedence.
If you’re interested, you can read more in the ServeMux docs.
Architecture 🔗
Monoliths and Decoupling
“Architecture” in software can mean many different things, but in this lesson, we’re talking about the high-level architecture of a web application from a structural standpoint. More specifically, we are concerned with the separation (or lack thereof) between the back-end and the front-end.
When we talk about “coupling” in this context, we’re talking about the coupling between the data and the presentation logic of that data. Loosely speaking, when I say “a tightly coupled front-end and back-end”, what I mean is:
Front-end: The presentation logic
If it’s a web app, then this is the HTML, CSS, and JavaScript that is served to the browser which will then be used to render any dynamic data. If it’s a mobile app, then this is the compiled code that is downloaded on the mobile device.
Back-end: Raw data
For an app like YouTube, this would be videos and comments. For an app like Twitter, this might be tweets and users data. You can’t embed the YouTube videos directly into the Youtube app, because a user’s feed changes each time they open the app. The app downloads new raw data from Google’s back-end each time the app is opened.
Monolithic

A monolith is a single, large program that contains all of the functionality for both the front-end and the back-end of an application. It’s a common architecture for web applications, and it’s what we’re building here in this course.
Sometimes monoliths host a REST API for raw data (like JSON data) within a subpath, like /api as shown in the image. That said, there are even more tightly coupled kinds of monoliths that inject the dynamic data directly into the HTML as well. The nice thing about separate data endpoints is that they can be consumed by any client, (like a mobile app) and not just the website. That said, injection is typically more performant, so it’s a trade-off. WordPress and other website builders typically work this way.
Decoupled

A “decoupled” architecture is one where the front-end and back-end are separated into different codebases. For example, the front-end might be hosted by a static file server on one domain, and the back-end might be hosted on a subdomain by a different server.
Depending on whether or not a load balancer is sitting in front of a decoupled architecture or not, the API server might be hosted on a separate domain (as shown in the image) or on a subpath, as shown in the monolithic architecture. A decoupled architecture allows for either approach.
Assignment
For now, Chirpy is technically a monolith. That said we are keeping all the API logic decoupled in the sense that it will be served from its own namespace (path prefix). We serve the website from the app path, and we’ll be serving the API from the /api path.
Let’s move our non-website endpoints to the /api namespace in our routing.
To do this, prepend /api to the beginning of each of our API endpoints, e.g. /api/healthz and /api/metrics
Which is better?
There is always a trade-off.
Pros for monoliths
- Simpler to get started with
- Easier to deploy new versions because everything is always in sync
- In the case of the data being embedded in the HTML, the performance can result in better UX and SEO
Pros for decoupled architectures
- Easier to scale as traffic grows
- Easier to practice good separation of concerns as the codebase grows
- Can be hosted on separate servers and using separate technologies
- Embedding data in the HTML is still possible with pre-rendering (similar to how Next.js works), it’s just more complicated
Can we have the best of both worlds?
Perhaps. My recommendation to someone building a new application from scratch would be to start with a monolith, but to keep the API and the front-end decoupled logically within the project from the start (like we’re doing with Chirpy).
That way, our app is easy to get started with, but we can migrate to a fully decoupled architecture later if we need to.
Admin Namespace
One of the advantages of a monolithic architecture is that it’s fairly simple to inject data directly into the HTML of a web page.
Assignment
Let’s swap out the /metrics endpoint, which just returns plain text, for an /admin/metrics (not under the /api namespace) endpoint that returns HTML intended to be rendered in the browser. It should be accessible via GET requests only.
Use this template:
<html>
  <body>
    <h1>Welcome, Chirpy Admin</h1>
    <p>Chirpy has been visited %d times!</p>
  </body>
</html>
Where %d is replaced with the number of times the page has been loaded.
Make sure you use the Content-Type header to set the response type to text/html so that the browser knows how to render it.
Try loading http://localhost:8080/admin/metrics in your browser, and in another tab load http://localhost:8080/app a few times. Refreshing the admin page should show the updated count.
Run and submit the HTTP tests using the CLI tool.
Deployment Options
We won’t go in-depth with deployment instructions right now, that said, let’s talk about how our choice of project architecture affects our deployment options, and how we could deploy our application in the future. We’ll only talk about cloud deployment options here, and by the “cloud” I’m just referring to a remote server that’s managed by a third-party company like Google or Amazon.

Using a cloud service to deploy applications is super common these days because it’s easy, fast, and cheap.
That said, it’s still possible to deploy to a local or on-premise server, and some companies still do that, but it’s not as common as it used to be.
Monolithic deployment
Deploying a monolith is straightforward. Because your server is just one program, you just need to get it running on a server that’s exposed to the internet and point your DNS records to it.
You could upload and run it on classic server, something like:
- AWS EC2
- GCP Compute Engine (GCE)
- Digital Ocean Droplets
- Azure Virtual Machines
Alternatively, you could use a platform that’s specifically designed to run web applications, like:
- Heroku
- Google App Engine
- Fly.io
- AWS Elastic Beanstalk
Decoupled deployment
With a decoupled architecture, you have two different programs that need to be deployed. You would typically deploy your back-end to the same kinds of places you would deploy a monolith.
For your front-end server, you can do the same, or you can use a platform that’s specifically designed to host static files and server-side rendered front-end apps, something like:
- Vercel
- Netlify
- GitHub Pages
Because the front-end bundle is likely just static files, you can host it easily on a CDN (Content Delivery Network) inexpensively.
More powerful options
If you want to be able to scale your application up and down in specific ways, or you want to add other back-end servers to your stack, you might want to look into container orchestration options like Kubernetes and Docker Swarm.
Don’t worry about all this stuff!
I’m trying to gently introduce you to some popular technologies and how they work together, but you don’t need to memorize all of these products and options.
JSON 🔗
HTTP Clients
So far, you have probably been using a browser to test your server. That works fine with simple GET requests (the kind of request a browser sends when you type a URL into the address bar), but it’s not very useful for any other HTTP methods or requests with custom headers and bodies.
Debugging your endpoints
Servers are built to be used by clients. As you develop your code, you should be using a tool that makes sending one-off requests to your server easy! Here are some of my favorites:
Use whichever client you like, but make sure you’re using one!
Why do I like Thunder Client?
Thunder Client is built into VS Code, so I don’t need to leave my editor, and it’s fairly minimalistic.
JSON
Hopefully, by now you already know what JSON is. If not, you should go back and take the Learn HTTP course here first.
What you may be new to is handling and parsing JSON on the server side, rather than sending it as a client.
If you want to take a super deep dive into JSON in Go, then you can read this post here. With that in mind, you don’t need to! I’ll give you the relevant info below.
Decode JSON request body
It’s very common for POST requests to send JSON data in the request body. Here’s how you can handle that incoming data:
{
  "name": "John",
  "age": 30
}
func handler(w http.ResponseWriter, r *http.Request){
type parameters struct {
// these tags indicate how the keys in the JSON should be mapped to the struct fields
// the struct fields must be exported (start with a capital letter) if you want them parsed
Name string `json:"name"`
Age int `json:"age"`
}
decoder := json.NewDecoder(r.Body)
params := parameters{}
err := decoder.Decode(¶ms)
if err != nil {
// an error will be thrown if the JSON is invalid or has the wrong types
// any missing fields will simply have their values in the struct set to their zero value
log.Printf("Error decoding parameters: %s", err)
w.WriteHeader(500)
return
}
// params is a struct with data populated successfully
// ...
}
Encode JSON response body
func handler(w http.ResponseWriter, r *http.Request){
    // ...

    type returnVals struct {
        // the key will be the name of struct field unless you give it an explicit JSON tag
        CreatedAt time.Time `json:"created_at"`
        ID int `json:"id"`
    }
    respBody := returnVals{
        CreatedAt: time.Now(),
        ID: 123,
    }
    dat, err := json.Marshal(respBody)
	if err != nil {
		log.Printf("Error marshalling JSON: %s", err)
		w.WriteHeader(500)
		return
	}
    w.Header().Set("Content-Type", "application/json")
    w.WriteHeader(200)
	w.Write(dat)
}
Assignment
At Chirpy, we have a silly rule that says all Chirps must be 140 characters long or less.
Add a new endpoint to the Chirpy API that accepts a POST request at /api/validate_chirp. It should expect a JSON body of this shape:
{
  "body": "This is an opinion I need to share with the world"
}
If any errors occur, it should respond with an appropriate HTTP status code and a JSON body of this shape:
{
  "error": "Something went wrong"
}
For example, if the Chirp is too long, respond with a 400 code and this body:
{
  "error": "Chirp is too long"
}
If the Chirp is valid, respond with a 200 code and this body:
{
  "valid": true
}
Tips
Use an HTTP client like Thunder Client to test your POST requests.
Use json.Marshal() like the example above to remove whitespace in your encoded data.
JSON Review
Struct 1
type parameters struct {
    Name string `json:"name"`
    Age int `json:"age"`
    School struct {
        Name string `json:"name"`
        Location string `json:"location"`
    } `json:"school"`
}
Struct 2
type parameters struct {
    name string `json:"name"`
    Age int `json:"age"`
}
Struct 3
type parameters struct {
    Name string
    Age int
}
The Profane
Not only do we validate that Chirps are under 140 characters, but we also have a list of words that are not allowed.
Assignment
We need to update the /api/validate_chirp endpoint to replace all “profane” words with 4 asterisks: ****.
Assuming the length validation passed, replace any of the following words in the Chirp with the static 4-character string ****:
- kerfuffle
- sharbert
- fornax
Be sure to match against uppercase versions of the words as well, but not punctuation. “Sharbert!” does not need to be replaced, we’ll consider it a different word due to the exclamation point. Finally, instead of the valid boolean, your handler should return the cleaned version of the text in a JSON response:
Example input
{
  "body": "This is a kerfuffle opinion I need to share with the world"
}
Example output
{
  "cleaned_body": "This is a **** opinion I need to share with the world"
}
Tips
Use an HTTP client like Thunder Client to test your POST requests.
I’d recommend creating two helper functions:
respondWithError(w http.ResponseWriter, code int, msg string)respondWithJSON(w http.ResponseWriter, code int, payload interface{})
These helpers are not required but might help DRY up your code when we add more endpoints in the future.
I’d also recommend breaking the bad word replacement into a separate function. You can even write some unit tests for it!
Here are some useful standard library functions:
Storage 🔗
Arguably the most important part of your typical web application is the storage of data. It would be pretty useless if each time you logged into your account on YouTube, Twitter or GitHub all of your subscriptions, tweets, or repositories were gone.
Let’s talk about how web applications store, or “persist” data to a hard disk.
Memory vs Disk
When you run a program on your computer, the program is loaded into memory. Memory is a lot like a scratch pad. It’s fast, but it’s not permanent. If the program terminates or restarts, the data in memory is lost.
When you’re building a web server, any data you store in memory (in your program’s variables) is lost when the server is restarted. Any important data needs to be saved to disk via the file system.
Assignment
Our API needs to support the standard CRUD operations for “chirps”. A “chirp” is just a short message that a user can post to the API, like a tweet. For now, we’ll just be adding the POST and GET endpoints to create and read chirps respectively.
POST /api/chirps
This endpoint should accept a JSON payload with a body field.
Request body:
{
  "body": "Hello, world!"
}
Delete the /api/validate_chirp endpoint that we created before, but port all that logic into this one. Users should not be allowed to create invalid chirps!
If the chirp is valid, you should give it a unique id and save it to disk. If all goes well, respond with a 201 status code and the full chirp resource. For now, just use integers for the id field, and increment the id by 1 for each new chirp.
Response body:
{
  "id": 1,
  "body": "Hello, world!"
}
GET /api/chirps
This endpoint should return an array of all chirps in the file, ordered by id in ascending order. Use a 200 code for success.
Response body:
[
  {
    "id": 1,
    "body": "First chirp"
  },
  {
    "id": 2,
    "body": "The second chirp that was chirped"
  }
]
Saving to disk
In a production system, you would almost certainly use a piece of database software like PostgreSQL or MySQL to store your data on disk. We’ll be learning SQL soon, but for now, we’ll just be using the file system to store our data. It’s less efficient, but it will work for our purposes.
Keep your entire “database” in a single file called database.json at the root of your project. Make sure to ignore it in Git. Your server should automatically create the file if it doesn’t exist upon startup. Here’s the structure of the file:
{
  "chirps": {
    "1": {
      "id": 1,
      "body": "This is the first chirp ever!"
    },
    "2": {
      "id": 2,
      "body": "Hello, world!"
    }
  }
}
Any time you need to update the database, you should read the entire thing into memory (unmarshal it into a struct), update the data, and then write the entire thing back to disk (marshal it back into JSON).
To make sure that multiple requests don’t try to write to the database at the same time, you should use a mutex to lock the database while you’re using it. Again, I didn’t say this will be efficient, but it will work!
While not necessary, I recommend encapsulating all of your database logic in an internal/database package.
Tips
Make sure to delete your database.json file every time before you run the tests!!! The tests assume that they start with a fresh database each time.
Here are some of the types and methods I used to create the database package to get you started:
type DB struct {
	path string
	mux  *sync.RWMutex
}
type DBStructure struct {
	Chirps map[int]Chirp `json:"chirps"`
}
// NewDB creates a new database connection
// and creates the database file if it doesn't exist
func NewDB(path string) (*DB, error)
// CreateChirp creates a new chirp and saves it to disk
func (db *DB) CreateChirp(body string) (Chirp, error)
// GetChirps returns all chirps in the database
func (db *DB) GetChirps() ([]Chirp, error)
// ensureDB creates a new database file if it doesn't exist
func (db *DB) ensureDB() error
// loadDB reads the database file into memory
func (db *DB) loadDB() (DBStructure, error)
// writeDB writes the database file to disk
func (db *DB) writeDB(dbStructure DBStructure) error
Here are some useful standard library functions to know about:
Database Review
As we talked about, normally you would use database software to store your data on disk. Your Go code would connect to a database using a library like database/sql and use SQL commands to query the database.
Sometimes that database runs on the same host machine as your server, but it’s also common to have a separate database server that your server connects to over the network.

What is a database?
We’ll talk more about databases in the future, but I chose to use a flat JSON file for this course because, at the end of the day, a “database” is just software that’s optimized to efficiently store and retrieve data from disk, and I really want to drive that point home.
Popular databases
You don’t need to know about these yet, but you might be curious about some of these technologies. Feel free to read about them if you have some spare time:
- PostgreSQL: A fantastic open-source SQL database.
- MySQL: Another open-source SQL database. Less fantastic IMO.
- MongoDB: A popular open-source NoSQL document database.
- Firebase: A popular cloud-based NoSQL database service.
Feel free to browse DB Engine if you want to dive deeper into the world of database technologies.
Get
Request sizes can get out of control quickly if users need to download every chirp in the database each time they want to read one.
Assignment
Add a new endpoint to your server that allows users to get a single chirp by ID. The response should be a 200 status code and the chirp resource.
GET /api/chirps/{chirpID}
The {chirpID} part of the path should be replaced with the ID of the chirp. For example, if the user wants to get chirp 1, they should make a request to /api/chirps/1.
{
  "id": 1,
  "body": "Hello, world!"
}
If the chirp does not exist, the server should return a 404 status code.
Tips
Make sure to delete your database.json file every time before you run the tests!!! The tests assume that they start with a fresh database each time.
- Use http.Request.PathValue to get the
chirpIDfrom the request. - strconv.Atoi can be used to convert a string to an integer.
Collections and Singletons
We’re building a fairly RESTful API.
REST is a set of guidelines for how to build APIs. It’s not a standard, but it’s a set of conventions that many people follow. Not all back-end APIs are RESTful, but many are, and as a back-end developer you’ll need to know how to build RESTful APIs.
Collections and Singletons
In REST, it’s conventional to name all of your endpoints after the resource that they represent, and for the name to be plural. That’s why we use POST /api/chirps to create a new chirp instead of POST /api/chirp.
To get a collection of resources it’s conventional to use a GET request to the plural name of the resource. That’s why we use GET /api/chirps to get all of the chirps.
To get a singleton, or a single instance of a resource, it’s conventional to use a GET request to the plural name of the resource, followed by the ID of the resource. That’s why we use GET /api/chirps/1 to get the chirp with ID 1.
Users
Our API is in a strange state at the moment - chirps can be created and read, but we have no concept of “users” which are to be the authors of chirps. Let’s add the ability to create users.
Assignment
Add a new endpoint to your server that allows users to be created. For now, a user will just have an id (integer) and an email (string).
POST /api/users
Request:
{
  "email": "[email protected]"
}
Response:
HTTP 201 Created
{
  "id": 1,
  "email": "[email protected]"
}
A new user should be created and persisted to the database.json file. Use the same id system used for chirps.
Tips
Make sure to delete your database.json file every time before you run the tests!!! The tests assume that they start with a fresh database each time.
Debug Mode
When you’re developing a server on your local machine, it’s super common to develop against a temporary local database, like we’ve been doing.
Obviously, you would never just delete a production database! You’d lose all of your user’s accounts and data!

It’s a pain to manually delete the database every time!
Here’s my recommendation: Add a --debug flag to your server that will delete the database upon server start. For example:
go build -o out && ./out --debug
You can use the flag when testing locally, but the DevOps team at Chirpy can leave it out when deploying to production.
This is optional, but I highly recommend it!
Parsing command line flags in Go
Use flag.Bool to create a pointer to a boolean value representing the --debug flag. Then, use flag.Parse to parse the command line and fill in the value of the pointer.
dbg := flag.Bool("debug", false, "Enable debug mode")
flag.Parse()
Authentication with Passwords 🔗
Authentication is the process of verifying who a user is. If you don’t have a secure authentication system, your back-end systems will be open to attack!
Imagine if I could make an HTTP request to the YouTube API and upload a video to your channel. YouTube’s authentication system prevents this from happening by verifying that I am who I say I am.
Passwords
Passwords are a common way to authenticate users. You know how they work: When a user signs up for a new account, they choose a password. When they log in, they enter their password again. The server will then compare the password they entered with the password that was stored in the database.
There are 2 really important things to consider when storing passwords:
- Storing passwords in plain text is awful. If someone gets access to your database, they will be able to see all of your users’ passwords. If you store passwords in plain text, you are giving away your users’ passwords to anyone who gets access to your database.
- Password strength matters. If you allow users to choose weak passwords, they will be more likely to reuse the same password on other websites. If someone gets access to your database, they will be able to log in to your users’ other accounts.
We won’t be writing code to validate password strength in this course, but you get the idea: you can enforce rules in your HTTP handlers to make sure passwords are of a certain length and complexity.
Hashing
On the other hand, we will be writing code to store passwords in a way that prevents them from being read by anyone who gets access to your database. This is called hashing. Hashing is a one-way function. It takes a string as input and produces a string as output. The output string is called a hash.
We’ll cover how hashing works in-depth in a later course. For now, just know that hashing is a way to store passwords in a way that prevents them from being read by anyone who gets access to your database, but still allows us to compare passwords when a user logs in.
Assignment
Update the POST /api/users endpoint, and create a new POST /api/login endpoint.
POST /api/users
Update the body parameters for this endpoint to include a new password field:
{
  "password": "04234",
  "email": "[email protected]"
}
Note: As long as your server uses HTTPS in production, it’s safe to send passwords in HTTP bodies, because the entire request is encrypted.
Hash the password using the bcrypt.GenerateFromPassword function. Bcrypt is a secure hash function that is intended to be used with passwords.
Be sure to store the hashed password in the database as you create the user.
The response from this endpoint should not include the password.
{
  "id": 1,
  "email": "[email protected]"
}
POST /api/login
This endpoint should allow a user to login. In a future exercise this endpoint will be used to give the user a token that they can use to make authenticated requests, but for now, let’s just make sure the password validation is working.
The login endpoint should accept this request body:
{
  "password": "04234",
  "email": "[email protected]"
}
You’ll need a new way to look up a user by their email address (you don’t have access to an ID here)! At the same time, it would be a good idea to update your database’s “create user” logic to ensure that 2 users can’t be created with the same email address.
Use the bcrypt.CompareHashAndPassword function to compare the password that the user entered in the HTTP request with the password that is stored in the database.
If either the user lookup or the password comparison errors, just return a 401 Unauthorized response with the message “Incorrect email or password”.
If the passwords match, return a 200 OK response and a copy of the user resource (without the password of course):
{
  "id": 1,
  "email": "[email protected]"
}
Passwords should never be reused
It’s a really bad idea for users to reuse the same passwords across sites. If someone figures out their password for one site, they can try it on other sites. If they get lucky, they can log in to and compromise many of their accounts.
Unfortunately, it’s very common for users to reuse passwords. We can’t force users to not reuse passwords on the server side, but we can take steps to make it harder for them to reuse passwords. Namely, we can require that passwords are strong.
Passwords should be strong
The most important factor for the strength of a password is its entropy. Entropy is a measure of how many possible combinations of characters there are in a string. To put it simply:
- The longer the password the better
- Special characters and capitals should always be allowed
- Special characters and capitals aren’t as important as length

Passwords should never be stored in plain text
The most critical thing we can do to protect our users’ passwords is to never store them in plain text. We should use cryptographically strong key derivation functions (which are a special class of hash functions) to store passwords in a way that prevents them from being read by anyone who gets access to your database.
Bcrypt is a great choice. SHA-256 and MD5 are not.
Types of Authentication
Here are a few of the most common authentication methods you’ll see in the wild:
- Password + ID (username, email, etc.)
- 3rd Party Authentication (“Sign in with Google”, “Sign in with GitHub”, etc)
- Magic Links
- API Keys
1. Password + ID
This is the most common type of authentication that requires a manual login from a user. When users use password managers, it’s one of the more secure ways to authenticate users, unfortunately, many users don’t, so it’s not as secure as it could be.
That said, it’s a valid choice.
2. 3rd Party Authentication
3rd party authentication is a way to authenticate users using a service like Google or GitHub (similarly to how we do it here on Boot.dev). 3rd party auth is great for user experience because it allows users to use their existing accounts to log in to your app, lowering friction.
It’s also nice because you don’t need to worry about storing passwords yourself, meaning you can outsource the security of your users’ passwords to a company that hopefully does a good job.
The only real drawback to 3rd party auth is that you’re trusting a 3rd party, and if your users don’t have an account with that 3rd party, they won’t be able to log in.
3. Magic Links
Magic links are a way to authenticate users without a password. It relies on the assumption that the user’s email is something that they have unique access to.
The webserver sends a link to the user’s email and encodes a unique token in that link. When the user clicks the link, the webserver can decode the token and use it to authenticate the user. Eg:
https://example.com/login?token=...
4. API Keys
API keys are a fantastic way to authenticate users and systems programmatically. An API Key is just a long secure string that uniquely identifies a user or system, and that can’t be guessed. Because they’re intended to be used in code, they don’t need to be memorized and as such can be much longer and double as an identifier. An API key might look something like this:
bd_JDS543J3n5NMKspDXNRlowiqw523lKHK32K43kl
Authentication with JWTs
There are several different ways to handle authentication. We’ll be using JWTs in this course. They’re a popular choice for APIs that are consumed by web applications and mobile apps.
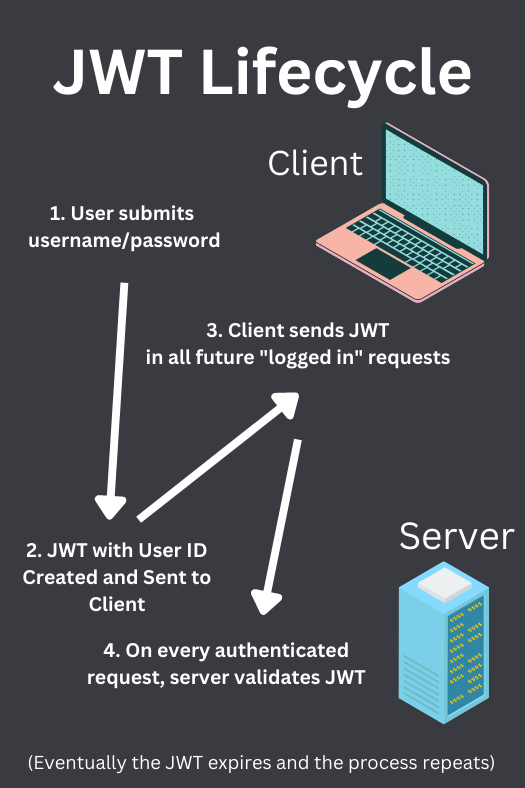
Step 1: Login
It would be pretty annoying if you had to enter your username and password every time you wanted to make a request to an API. Instead, after a user enters a username and password, our server should respond with a token (JWT) that’s saved in the client’s device.
The token remains valid until it expires at which point the user will need to log in again.
Step 2: Using the token
When the user wants to make a request to the API, they send the token along with the request in the HTTP headers. The server can then verify that the token is valid, which means the user is who they say they are.
What is a JWT?
A JWT is a JSON Web Token. It’s a cryptographically signed JSON object that contains information about the user. You’ll learn about how the cryptography of JWTs work in our Learn Cryptography course, for now, it’s just important to know that once the token is created by the server, the data in the token can’t be changed without the server knowing.
When your server issues a JWT to Bob, bob can use that token to make requests as Bob to your API. Bob won’t be able to change the token to make requests as Alice.
Assignment
Update the POST /api/login endpoint, and create a new PUT /api/users endpoint.
POST /login
This endpoint should accept a new optional expires_in_seconds field in the request body:
{
  "password": "04234",
  "email": "[email protected]",
  "expires_in_seconds": 2
}
JWT Secret
First, you’ll need to create a secret for your server - the secret is used to sign and verify JWTs. By keeping it safe, no other servers will be able to create valid JWTs for your server.
Secrets shouldn’t be stored in Git, just in case anyone malicious gains access to your repository. Environment variables are simple key/value pairs that are available to the programs you run. They’re a platform-agnostic way to store secrets and configuration information.
We could manually set environment variables in our shell each time we start a session, but that’s a pain. Instead, we’ll store the secret in a gitignore’d file called .env at the root of the repo. That file should look like this:
JWT_SECRET=your-secret-key
Replace your-secret-key with a long, random string. You can generate one on the command line like this:
openssl rand -base64 64
Because we’re using a file, and not manually adding the variable to our session, we’ll need to use a library to load the environment variables. We’ll use godotenv. Once you’ve installed the package, you can load the environment variables at the top of your main() function like this:
// by default, godotenv will look for a file named .env in the current directory
godotenv.Load()
Then you can load the JWT_SECRET variable using the standard library like this:
jwtSecret := os.Getenv("JWT_SECRET")
You’ll want to store the jwtSecret in your apiConfig struct so that your handlers can access it.
Creating a JWT
Create a JWT using this JWT library. Again, you’ll need to install the library. You’ll need to:
- Use jwt.NewWithClaims to create a new token.
- Use jwt.SigningMethodHS256 as the signing method.
- Use jwt.RegisteredClaims as the claims.
- Set the
Issuerto “chirpy” - Set
IssuedAtto the current time in UTC - Set
ExpiresAtto the current time plus the expiration time (expires_in_seconds) - Set the
Subjectto a stringified version of the user’sid
- Set the
- Use token.SignedString to sign the token with the secret key. Refer to here for an overview of the different signing methods and their respective key types.
expires_in_seconds is an optional parameter. If it’s specified by the client, use it as the expiration time. If it’s not specified, use a default expiration time of 24 hours. If the client specified a number over 24 hours, use 24 hours as the expiration time.
Once you have the token, respond to the request with a 200 code and this body shape:
{
  "id": 1,
  "email": "[email protected]",
  "token": "eyJhbGciOiJIUzI1NiIsInR5cCI6IkpXVCJ9.eyJzdWIiOiIxMjM0NTY3ODkwIiwibmFtZSI6IkpvaG4gRG9lIiwiaWF0IjoxNTE2MjM5MDIyfQ.SflKxwRJSMeKKF2QT4fwpMeJf36POk6yJV_adQssw5c"
}
PUT /api/users
This endpoint should update a user’s email and password.
This is our first authenticated endpoint, which means it will require a JWT to be present in the request headers:
Authorization: Bearer <token>
Notice that there is not an id in the path, that’s because we already know the id of the user from the JWT in the headers.
Validating the JWT
First, extract the token from the request headers using r.Header.Get. Remember, you’ll need to strip off the Bearer prefix.
Next, use the jwt.ParseWithClaims function to validate the signature of the JWT and extract the claims into a *jwt.Token struct. An error will be returned if the token is invalid or has expired. If the token is invalid, return a 401 Unauthorized response.
If all is well with the token, use the token.Claims interface to get access to the user’s id from the claims (which should be stored in the Subject field).
Updating the user
If the JWT was valid, you should now have the ID of the authenticated user. Use that ID to look up the user in the database and update their fields with the parameters from the request body.
{
  "email": "[email protected]",
  "password": "04234"
}
You’ll probably need to add a new UpdateUser method to your database package.
After updating the user, return a copy of the updated user resource (without the password) and a 200 status code.
Revoking JWTs
Access tokens
One of the main benefits of JWTs is that they’re stateless. The server doesn’t need to keep track of which users are logged in via JWT. The server just needs to issue a JWT to a user and the user can use that JWT to authenticate themselves. Statelessness is fast and scalable, your server doesn’t need to consult a database to see if a user is currently logged in.
However, that same benefit poses a potential problem. JWTs can’t be revoked. If a user’s JWT is stolen, there’s no easy way to stop the JWT from being used. JWTs are just a signed string of text.
The JWTs we’ve been using so far are more specifically access tokens. Access tokens are used to authenticate a user to a server, and they provide access to protected resources. Access tokens are:
- Stateless
- Short-lived (15m-24h)
- Irrevocable
They must be short-lived because they can’t be revoked. The shorter the lifespan, the more secure they are. Trouble is, this can create a poor user experience. We don’t want users to have to log in every 15 minutes.
#A solution: refresh tokens
Refresh tokens don’t provide access to resources directly, but they can be used to get new access tokens. Refresh tokens are much longer lived, and importantly, they can be revoked. They are:
- Stateful
- Long-lived (24h-60d)
- Revocable
Now we get the best of both worlds! Our endpoints and servers that provide access to protected resources can use access tokens, which are fast, stateless, simple, and scalable. On the other hand, refresh tokens are used to keep users logged in for longer periods of time, and they can be revoked if a user’s access token is compromised.
Refresh Tokens
To allow our users to stay logged in for longer periods, let’s add refresh tokens to our authentication system. At the same time, we’ll reduce the lifespan of our access tokens to improve security.
Session store
In our case, a refresh token will just be a random 256-bit string. It’s a token, but not a JSON Web Token. It doesn’t need to be a JWT because we’ll store it in our database and associate it with a user server-side. No point in using stateless JWTs if we’re going to store them in a database anyway.
To revoke a refresh token, we’ll simply delete it from the database.
Assignment
We need to:
- Update the
POST /api/loginendpoint - Add the
POST /api/refreshendpoint - Add the
POST /api/revokeendpoint
POST /api/login
The login endpoint should now return this shape:
{
  "id": 1,
  "email": "[email protected]",
  "token": "eyJhbGciOiJIUzI1NiIsInR5cCI6IkpXVCJ9.eyJzdWIiOiIxMjM0NTY3ODkwIiwibmFtZSI6IkpvaG4gRG9lIiwiaWF0IjoxNTE2MjM5MDIyfQ.SflKxwRJSMeKKF2QT4fwpMeJf36POk6yJV_adQssw5c",
  "refresh_token": "56aa826d22baab4b5ec2cea41a59ecbba03e542aedbb31d9b80326ac8ffcfa2a"
}
- Access tokens (JWTs) should expire after 1 hour. Expiration time is stored in the
expclaim. - Refresh tokens should expire after 60 days. Expiration time is stored in the database.
I used the following standard library functions to generate the refresh tokens:
- rand.Read to generate 32 bytes (256 bits) of random data from the
crypto/randpackage (math/rand’sReadfunction is deprecated). - hex.EncodeToString to convert the random data to a hex string
POST /api/refresh
This new endpoint does not accept a request body but does require a refresh token to be present in the headers, in the same Authorization: Bearer <token> format.
Look up the token in the database. If it doesn’t exist, or if it’s expired, respond with a 401 status code. Otherwise, respond with a 200 code and this shape:
{
  "token": "eyJhbGciOiJIUzI1NiIsInR5cCI6IkpXVCJ9.eyJzdWIiOiIxMjM0NTY3ODkwIiwibmFtZSI6IkpvaG4gRG9lIiwiaWF0IjoxNTE2MjM5MDIyfQ.SflKxwRJSMeKKF2QT4fwpMeJf36POk6yJV_adQssw5c"
}
The token field should be a newly created access token that expires in 1 hour.
POST /api/revoke
This new endpoint does not accept a request body but does require a refresh token to be present in the headers, in the same Authorization: Bearer <token> format.
Revoke the token in the database that matches the token that was passed in the header of the request. Respond with a 204 status code. A 204 status means the request was successful but no body is returned.
Cookies
HTTP cookies are one of the most talked about but least understood aspects of the web.
When cookies are talked about in the news, they’re usually implied to simply be privacy-stealing bad guys. While cookies can certainly invade your privacy, that’s not what they are.
What is an HTTP cookie?
A cookie is a small piece of data that a server sends to a client. The client then dutifully stores the cookie and sends it back to the server on subsequent requests.
Cookies can store any arbitrary data:
- A user’s name, or other tracking information
- A JWT (refresh and access tokens)
- Items in a shopping cart
- etc.
The server decides what to put in a cookie, and the client’s job is simply to store it and send it back.
How do cookies work?
Simply put, cookies work through HTTP headers.
Cookies are sent from the server to the client in the Set-Cookie header. Cookies are most popular for web (browser-based) applications because browsers automatically send any cookies they have back to the server in the Cookie header.
Why aren’t we using cookies in Chirpy?
Simply put, Chirpy’s API is designed to be consumed by mobile apps and other servers. Cookies are primarily for browsers.
A good use-case for cookies is to serve as a more strict and secure transport layer for JWTs within the context of a browser-based application.
For example, when using httpOnly cookies, you can ensure that 3rd party JavaScript that’s being executed on your website can’t access any cookies. That’s a lot better than storing JWTs in the browser’s local storage, where it’s easily accessible to any JavaScript running on the page.
Authorization 🔗
While authentication is about verifying who a user is, authorization is about verifying what a user is allowed to do.
For example, a user might be authenticated as [email protected], but that doesn’t mean that they should be allowed to delete chirps authored by [email protected]. Only the user who created the chirp should be allowed to delete it.
Authorization logic is just the code that enforces these kinds of rules.
Assignment
Update the POST /api/chirps endpoint to only allow users to create chirps if they are authenticated. When they do create a chirp, the chirp should be associated with the user who created it. Add a new author_id field to your chirps and use it to store the user’s ID.
Make sure that the GET /api/chirps endpoints return the author_id field as well.
Authentication vs Authorization
As we covered briefly, authentication and authorization are two different things.
Authentication
Verify who a user is, typically by asking for a password, api key, or other credentials.
Authorization
Only allow a verified user to perform actions that they are allowed to perform. Sometimes it’s based on exactly who they are, but often it’s based on a role, like “admin” or “owner”.
Delete Chirp
Assignment
Add a new DELETE /api/chirps/{chirpID} route to your server that deletes a chirp from the database.
This is an authenticated endpoint, so be sure to check the token in the header. Only allow the deletion of a chirp if the user is the author of the chirp. If they aren’t return a 403 status code.
If the chirp is deleted successfully, return a 204 status code..
Note: for simplicity we set the chirp id to len(dbStructure.Chirps) + 1. Though the HTTP tests do not test for this, consider what happens if a user does not delete the most recent chirp. We will get an ID conflict!
Webhooks 🔗
Webhooks sound like a scary advanced concept, but they’re quite simple.
A webhook is just an event that’s sent to your server by an external service when something happens.
For example, here at Boot.dev we use Stripe as a third-party payment processor. When a student makes a payment, Stripe sends a webhook to the Boot.dev servers so that we can unlock the student’s membership.
- Student makes a payment to stripe
- Stripe processes the payment
- If the payment is successful, Stripe sends an
HTTP POSTrequest tohttps://api.boot.dev/stripe/webhook(that’s not the real URL, but you get the idea)
That’s it! The only real difference between a webhook and a typical HTTP request, is that the system making the request is an automated system, not a human loading a webpage or web app. As such, webhook handlers must be idempotent because the system on the other side may retry the request multiple times.
Idempo… what?
Idempotent, or “idempotence”, is a fancy word that means “the same result no matter how many times you do it”. For example, your typical POST /api/users (create a user) endpoint will not be idempotent. If you send the same request twice, you’ll end up with two users with the same information but different IDs.
Webhooks on the other hand should be idempotent, and it’s typically easy to build them this way because it’s the client that’s sending some kind of “event”, and they’ll usually be providing their own unique ID.
Assignment
We recently rolled out a new feature called “Chirpy Red”. It’s a membership program, and members of “Chirpy Red” get vaporware features that we’ll announce in the future.
Until then, the only thing that Chirpy Red members get is a special badge on their profile page.
Chirpy uses “Polka” as its payment provider, and they send us webhooks whenever a user upgrades their account to Chirpy Red. We need to mark users as Chirpy Red members when we receive these webhooks.
POST /api/polka/webhooks
This endpoint should accept a request body of this shape:
{
  "event": "user.upgraded",
  "data": {
    "user_id": 3
  }
}
If the event is any other than user.upgraded, the endpoint should simply immediately respond with a 204 status code - we don’t care about any other events.
However, if the event is user.upgraded, then it should then go update the user in the database, and mark that they are a Chirpy Red member.
If the user is upgraded successfully, the endpoint should respond with a 204 status code and an empty response body. If the user can’t be found, the endpoint should respond with a 404 status code.
Updating the “User” resource
The User resource should be updated to include a new field called is_chirpy_red. This field should be a boolean, and it should default to false when a user is created, only becoming true when the user is upgraded to Chirpy Red.
The is_chirpy_red field should be present on all the endpoints that return a User resource, including the POST /api/login endpoint.
Webhooks Review
A webhook is just an event that’s sent to your server by an external service. There are just a couple of things to keep in mind when building a webhook handler:
- The third-party system will probably retry requests multiple times, so your handler should be idempotent
- Be extra careful to never “acknowledge” a webhook request unless you processed it successfully. By sending a
2XXcode, you’re telling the third-party system that you processed the request successfully, and they’ll stop retrying it. - When you’re writing a server, you typically get to define the API. However, when you’re integrating a webhook from a service like Stripe, you’ll probably need to adhere to their API: they’ll tell you what shape the events will be sent in.
Are webhooks and websockets the same thing?
Nope! A websocket is a persistent connection between a client and a server. Websockets are typically used for real-time communication, like chat apps. Webhooks are a one-way communication from a third-party service to your server.
We’ll talk about websockets in a future course.
API Keys
You may have noticed that there is an issue with our webhook handler: it’s not secure!
Anyone can send a request to our webhook handler, and we’ll process it. That means that if Chirpy users figured out our API documentation, they could simply upgrade their account without paying!
Assignment
Luckily, Polka has a solution for this: API keys. Polka provided us with an API key, and if a request to our webhook handler doesn’t use that API key, we should reject the request. This ensures that only Polka can tell us to upgrade a user’s account.
Your Polka key: f271c81ff7084ee5b99a5091b42d486e
Add that key to your .env file and load it into your app when your server starts.
POST /api/polka/webhooks
When you receive a request to your webhook handler, you should expect an API key in this header format:
Authorization: ApiKey <key>
Where <key> is the API key that Polka provided you. If any events come in without that API key, you should immediately respond with a 401 status code.
Documentation 🔗
When you’re designing a server-side API, no one is going to know how to interact with it unless you tell them. Are you going to force the front-end developers, mobile developers, or other back-end service teams to sift through your code and reverse engineer your API?
Of course not! You’re a good person. You’re going to write documentation.
First be obvious, then document it anyway
We’ve talked a lot about how your REST API should follow conventions as much as possible. That said, the conventions aren’t enough. You still need to document your endpoints. Without documentation, no one will know:
- Which resources are available
- What the path to the endpoints are
- Which HTTP methods are supported for each resource
- What the shape of the data is for each resource
- etc
Assignment
One type of endpoint that’s nearly impossible to interact with without documentation is a plural GET endpoint, that is, an endpoint that returns a list of resources.
That’s because they often have different sorting, filtering, and pagination features.
Update the GET /api/chirps endpoint. It should accept an optional query parameter called author_id. If the author_id query parameter is provided, the endpoint should return only the chirps for that author. If the author_id query parameter is not provided, the endpoint should return all chirps as it did before.
For example:
GET http://localhost:8080/api/chirps?author_id=1
Continue sorting the chirps by id in ascending order.
Tips
The http.Request struct has a way to grab the query parameters from the URL:
s := r.URL.Query().Get("author_id")
// s is a string that contains the value of the author_id query parameter
// if it exists, or an empty string if it doesn't
How to document
As far as creating documentation goes, there are 2 main approaches:
- Manually write documentation
- Use a tool to generate documentation
Obviously, the first approach is easier to get going with if you have a small API, but as the system grows, it can be really hard to keep the documentation up to date.
Incorrect documentation is worse than no documentation.
At least when there is no documentation your clients will reach out and ask for clarification. When the documentation is incorrect, it can lead to a lot of wasted time and frustration.
Manually writing documentation
When I’ve worked on smaller teams, we’ve generally opted to write our documentation in Markdown files and host them on GitHub. This is a great way to get started because Markdown is a simple format that is easy to write and easy to read.
Some automated tools to be aware of
I’ve also written and consumed APIs that have used:
- Swagger
- GraphQL (not RESTful, but still a networking API)
- Godoc (which only works for REST APIs if you provide an SDK)
- Postman (only useful if your team all uses Postman as their HTTP client)
Okay, but what should I do now?
I recommend writing documentation for your personal projects in Markdown files and storing them alongside the rest of your code in Git. Your project’s README.md file is a great place to start, but it’s also common for the README.md file to link to a /docs folder that contains more detailed documentation. The benefits are:
- It’s easy to get started writing docs
- The documentation lives alongside your code, so it’s easy to keep it up to date
- You’ll learn Markdown, which is a great skill to have
- GitHub/GitLab will render your Markdown files for you, so your docs will look great
Sorting Chirps
In a more robust server, especially one that uses UUIDs or something instead of auto-incrementing integers, we would probably want to sort by created_at time.Time instead of a numeric id.
That said, this is the same concept, and works just fine for our little server.
Assignment
Update the GET /api/chirps endpoint. It should accept an optional query parameter called sort. It can have 2 possible values:
asc- Sort the chirps in the response byidin ascending orderdesc- Sort the chirps in the response byidin descending order
asc is the default if no sort query parameter is provided.
Examples of valid URLs
GET http://localhost:8080/api/chirps?sort=asc&author_id=2GET http://localhost:8080/api/chirps?sort=ascGET http://localhost:8080/api/chirps?sort=descGET http://localhost:8080/api/chirps
Adding a README
You’re done building Chirpy! Great work!
I want to take a moment to cover how you should think about your public GitHub profile, and especially how it can help you in your job search.
We’ll be adding a more in-depth module on building a professional GitHub profile in the future, but for now, I want to cover some basics.
Do I have to put this on GitHub?
You really should. It doesn’t necessarily need to be publicly visible, but it’s good to keep copies of all of your code for future reference.
Projects are your professional portfolio
When you start looking for jobs, you’re going to want a couple of great projects on your GitHub or GitLab profile that show off your skills.
This probably isn’t one of those because you built it using a guide.
That said, it may be wise to treat this project like one and get your feet wet with the process of presenting a project to the world.
How to present this project
When someone navigates to your project’s link, the first thing they’ll see is the README.md file. You should quickly and concisely explain:
- What your project does
- Why someone should care
- How to install and run your project
Take a look at one of my portfolio projects as an example: go-rabbitmq.
Good luck!