In this post, we’ll be talking about coding with a common integration pattern with an external API called a webhook. Loosely speaking, there are three main types of communication you’ll see when building an application.
- Frontend to Backend.
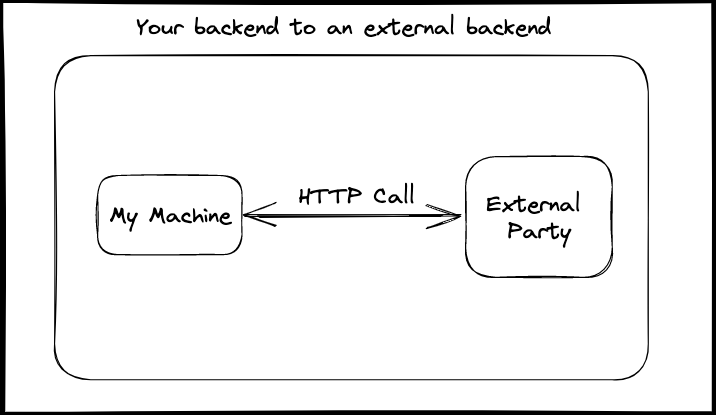
- Your backend to an external backend (API).
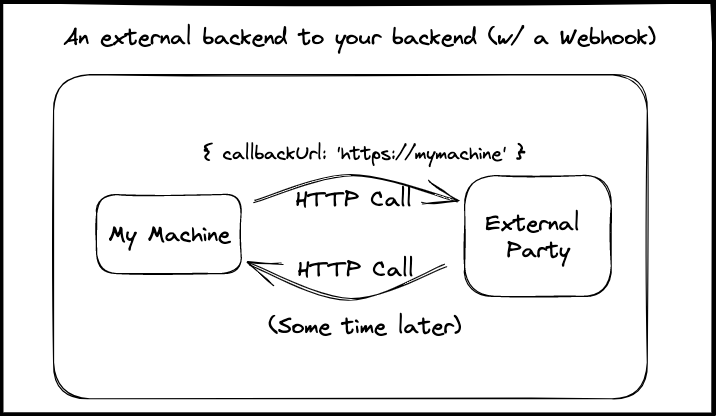
- An external backend to your backend (API).
When first learning to code, we focus largely on the first two. However, in practice, the third type, commonly known as a webhook, is also prevalent. Before we get started, let’s settle on some terminology.
What is an asynchronous flow and why are they important? 🔗
Let’s start first with what you probably already know. When you send an HTTP request to an API and expect an immediate response, that is a synchronous call. Your code waits for the API to respond, and ties up resources on your server while it is servicing that request. The resources tied up differs depending on your language and web framework, but typically a thread is tied up, or at the very least CPU time and RAM are consumed while waiting.
While this is sufficient for most applications, eventually you will come across a scenario where synchronous communication does not fit the bill. Some examples:
- The request you sent to the external API is computationally expensive - waiting for a synchronous response will result in a timeout, which depending on the platform is typically between 10 and 30 seconds.
- The external API or platform will not have an immediate answer for your request. A common use case here would be a workflow requiring a human on the other side to complete a task before responding to you.
An asynchronous flow is any type of communication between two parties that is not immediate. You might send a request to an API and get an immediate response, but you will not get any data of good use (don’t worry if this doesn’t seem to make sense now, we’ll explain further in the example below).
This eliminates the need for both parties to be available for your request at the same time, making it ideal for applications that involve a human in the loop or are computationally expensive.
What is a webhook? 🔗
Now that we know what an asynchronous flow is, what is a webhook? Put simply, a webhook is a call to your API that is the result of an event that happened in an external system. Webhooks allow applications to communicate in real-time, but asynchronously.
Rolling with the example provided above, imagine you’re tasked with integrating with a Help Desk company that provides agents that reviews documents your users submit.
- You make an API call to the Help Desk company with the location of the document for them to review.
- That API call immediately responds with an
agentIdrepresenting the agent assigned to the case, adocumentId, and a status ofPENDING_REVIEWfor the case. - When the agent reviews the document, it is ultimately marked as
ACCEPTEDorDECLINED. At this time, the Help Desk company will trigger a webhook, call your API, tell you the status, along with thedocumentId.
For completeness, I will call out that there are other ways to solve this problem, such as API Polling, but we will avoid discussion of API Polling as webhooks are much more efficient.
Now that we have the terminology settled, let’s run through an example below.
This code is all available here, so you can either follow along commit by commit (I’ll link to the commits throughout), review the Pull Request here, or start where I am starting at this commit.
Prerequisites 🔗
In order to complete this section, you’ll need a few things set up on your machine.
Getting Situated 🔗
First off, we’ll be working in TypeScript and using a framework called AdonisJS (don’t be too worried about this, I’ll hold your hand through anything not obvious.)
In our repository, we have a few different components set up via docker containers. If you’re not familiar with docker, there’s a great course on docker in the boot.dev curriculum, although it’s not required to have any knowledge of docker for this article.
If you’d like to take a look at our docker containers for this article, all of the components are defined in our
docker-compose.yml file here.
Let’s step through what each component is.
- We have the
adonis_appwhich we’ll be using to call our external API. - We also have an
external_api, which is somewhat self-explanatory. This is the “Help Desk” API that we’ll be calling that we can expect a webhook from at a later time. - In addition, there’s a
postgrescontainer, as we’ll need to store some data along the way. - There’s also a
rediscontainer, but we won’t be touching it, it’s solely to facilitate our artificial webhook delay.
You can find the routes in api/routes/start.ts, which is where we’ll be doing our implementation, and also in
external/routes/start.ts for the external API (these are already implemented for you).
Alright, what will we be building? Sticking with the example above in our explanation of webhooks, we’ll be calling a POST endpoint to request a review for a document:
POST /document

Expected Request Body:
{
   documentUrl: string
}

Expected Response Body:
{
   agentId: string,
   documentId: string
}
As you can see, while we want to know if the document has been ACCEPTED or DECLINED, in our help desk world, we need
to wait for a human to review it (the external API will artifically simulate a human review in this case by just waiting 2-5 seconds
before triggering our webhook - you can see this code in external/routes/start.ts)
With that said, here’s the structure of the payload we can expect to receive in our own API, via webhook.
POST /document/update

Expected Request Body:
{
   agentId: string,
   documentId: string,
   documentStatus: 'ACCEPTED' | 'DECLINED'
}
Notice how I didn’t note the Expected Response Body? That’s because most webhooks don’t really take much care to what you respond - as long as you return a 200, 201, or 202 status code, they’ll treat the call as a success and move on.
Implementation 🔗
Before we do anything in this section, you’ll want to pull down the git repository found
here, run git checkout 292dff8f29a75eb7bb70e337ed32116bd9db68d4 and then git checkout -b webhook-tutorial to navigate to the proper starting
point.
Once that’s done, run docker compose up from the root of the repository to bring up all of the containers needed for this
next section.
The Help Desk API Call 🔗
Let’s start developing. First, let’s navigate to the api folder in our terminal and install Axios, a library that
allows you to make HTTP calls with little effort.
Our current project uses NPM, so let’s add Axios as a dependency:
npm install axios. Resulting commit
here.
A quick rule of thumb here to note if you’re new to Javascript or Typescript projects, if you see a package-lock.json,
you should use NPM, if you see a yarn.lock in the root instead, you should use Yarn.
Now with Axios installed, let’s call the external API. We’re going to set things up so whenever you make a GET
call by visiting a page in the browser, the external API will be called (and subsequently triggering a webhook
afterwards.)
In our api folder, modify routes/start.ts to have the following logic for our base path (right around where you see
return { hello: 'world' }).
import axios from "axios";

const OUR_API = "http://adonis_app:3333";
const HELP_DESK_API = "http://external_api:8080";

Route.get("/", async () => {
  await axios.post(
    `${HELP_DESK_API}/document`,
    { documentUrl: "https://www.boot.dev/community/" },
    { headers: { "X-Callback-Url": `${OUR_API}/document/update` } }
  );
});
A couple of things to note in the commit here.
- In a real, live system, you’d probably want to define
OUR_APIandEXTERNAL_APIin an environment file. For the simplicity of this tutorial, we’ve hard coded them. - The first parameter to
axios.postis the endpoint you want to hit on the external API. Rolling with our example of a Help Desk API, we’re requesting a document review ofhttps://www.boot.dev/community/, which is the second parameter, the body of the request. - The third parameter defines “options” for the request. In this case, we define an
X-Callback-Urlheader, telling the Help Desk API where we want to receive our webhook when the data is ready for us. The name of this tends to vary depending on the platform you’re integrating with - sometimes it’s also defined asX-Webhook-Urlor is defined manually in an admin panel.
If you’re interested how webhooks might vary depending on the platform you’re integrating with, you can check out this blog post which touches upon different types of webhooks and how to improve your developer experience around them when developing in local environments.
The Webhook 🔗
With all of this confiugured, let’s get to the meat and potatoes of it all, so we can see the webhook working. We’ll want to do a few things.
- Set up a database table, we’ll want to store the
agentIdanddocumentIdfrom the original response, so we know what request the webhook belongs to later when we receive it. - Implement the API Contract, we’ll need to actually receive the webhook
- Test things, and make sure they’re working as we expect.
Setting up the Database 🔗
Setting up the database table is relatively straight forward in AdonisJS, from your terminal, run
npm run ace make:model document_review and then npm run ace make:migration document_review
This will create the model in AdonisJS, as well as the migration that sets up the database table. You can see the resulting commit here.
Now, let’s modify the structure of the model and the table to store the variables we’ll need.
In the DocumentReview.ts model file:
export default class DocumentReview extends BaseModel {
  @column({ isPrimary: true })
  public id: number;

  @column()
  public documentUrl: string;

  @column()
  public agentId: string;

  @column()
  public documentId: string;

  @column()
  public documentStatus: string;

  @column.dateTime({ autoCreate: true })
  public createdAt: DateTime;

  @column.dateTime({ autoCreate: true, autoUpdate: true })
  public updatedAt: DateTime;
}
And in your migration file:
public async up() {
    this.schema.createTable(this.tableName, (table) => {
      table.increments('id')

      table.string('document_url')
      table.string('agent_id')
      table.string('document_id')
      table.string('document_status')

      table.timestamp('created_at', { useTz: true })
      table.timestamp('updated_at', { useTz: true })
    })
  }
The commit for this can be found here.
Since we updated these files, we’ll need to actually run the migration, telling AdonisJS to update our database to have
the columns that we need. npm run ace migration:run runs all migrations files that have not been run against our
database yet, so let’s go ahead and run it. You should see something similar to the following:
> [email protected] ace
> docker exec -it adonis_app node ace migration:run

❯ migrated database/migrations/1678285144402_document_reviews
Since we now have a table to store this data, we can go back and update our API call to the Help Desk to store some of these variables.
import DocumentReview from 'App/Models/DocumentReview'

... Other code here

Route.get('/', async () => {
   const documentToReview = 'https://www.boot.dev/community'
   const response = await axios.post(
           `${HELP_DESK_API}/document`,
           { documentUrl: documentToReview },
           { headers: { 'X-Callback-Url': `${OUR_API}/document/update` } }
   )

   await DocumentReview.create({
      documentUrl: documentToReview,
      agentId: response.data.agentId,
      documentId: response.data.documentId,
      documentStatus: 'PENDING_REVIEW',
   })
})
With this, we’re ready to implement the API on our side.
Implementing the API Contract 🔗
As we noted above, we can expect the following payload back from the Help Desk API:
POST /document/update

Expected Request Body:
{
   agentId: string,
   documentId: string,
   documentStatus: 'ACCEPTED' | 'DECLINED'
}
Thus, we need to actually create the endpoint on our side. In start/routes.ts,
let’s implement the logic
to receive the API call, as well as update the database with the result of the review based on the documentId.
Route.post("/document/update", async ({ request }) => {
  const { agentId, documentId, documentStatus } = request.body();

  await DocumentReview.query()
    .where("documentId", documentId)
    .update({ agentId: agentId, documentStatus: documentStatus });
});
We’re now ready to test!
Testing 🔗
Since we already ran docker compose up earlier, all of your containers should be running already. In a web browser,
navigate to http://localhost:3333/.
If you don’t get any response, you’ll have to run docker compose up, and keep your containers up in the background.
A blank page should load. In order, the following happens.
- The
/route onapi/start/routes.tsreaches out to the Help Desk API and stores the variables from the response. - There’s a delay of approximately 2-5 seconds (if you’re curious how this works, check out
external/start/routes.tsandexternal/start/document-subscriber.ts) - The external API calls back to your
/document/updateendpoint inapi/start/routes.ts, updating thedocumentStatusfield.
If you’re not convinced, I’ve created a utility script under api that allows you to get into your database.
From your terminal, run ./local_db.sh. You’ll see a prompt for psql, the command line utility for Postgres.
psql (13.10 (Debian 13.10-1.pgdg110+1))
Type "help" for help.

adonis_app=>
\dt and enter should display the current tables. You should see your document_reviews table.
Now, you can execute the following to see the table contents, feel free to run it in quick succession, to see the values in the database both before and after the webhook hits your API.
SELECT * FROM document_reviews;
\q will exit the psql prompt.
We’re done here!
Going Further 🔗
Want to go further and learn more about webhooks? Here are some features you would typically see implemented in a live environment if you’re interested in doing some more digging.
Retries 🔗
When a webhook call fails, you’ll need to retry it at a later time. Most retry policies have an exponential
backoff. In our example,
this would be implemented in the external API.
Refactor logic into a controller 🔗
Our implementation currently has all the logic in the routes.ts file. Consider refactoring the logic into a
controller. You can see an example of this with the AuthorizationsController.
Write some tests 🔗
No pull request is complete without tests! Feel free to write some.
Implement idempotency 🔗
Learn about idempotency, and implement a middleware for idempotent requests.
Validate the payload of the request 🔗
What happens if we hit our webhook without the variables we expect? Can we handle it more gracefully?
Optimize your database, add indices 🔗
Our webhook queries the database on the documentId field, which is not an index. If we had many items in the database, the query would be slow.