
What is Superdense coding? 🔗
Superdense coding is a quantum communications protocol that allows a user to send 2 classical bits by sending only 1 qubit.
The Protocol 🔗
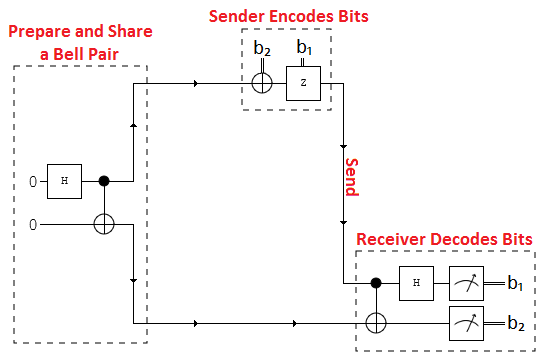
Step 1: Preparing the Bell Pair 🔗
First a bell pair consisting of 2 qubits is prepared. Where q0 is the senders qubit and q1 is the receivers qubit. To do this q0 is put in to a superposition of states using a hadamard gate.
Then a CNOT operation is performed with q0 being the control and q1 being the target.
Step 2: Encode The Information On To Q0 🔗
Next the sender has to encode the information they want to send on to q0 by applying certain operations to it.
- If they want to send 00 then they perform no operation.
- If they want to send 01 then they perform a Pauli-X operation where q1s state is flipped.
- If they want to send 10 then they apply a Pauli-Z gate.
- If they want to send 11 then apply a Pauli-Z gate followed by a Pauli-X gate
Step 3: Receiver Decodes the Information 🔗
Next q0 is sent and the receiver has to decode the qubit. This is done by applying a CNOT where the received q0 is the control and q1 is the target. Then a hadamard gate is applied to q0.
How To Run The Program 🔗
- Copy and paste the code below in to a python file
- Enter your API token in the IBMQ.enable_account(‘Insert API token here’) part
- Save and run
Code 🔗
print('\n Superdense Coding')
print('--------------------------\n')

from qiskit import QuantumRegister, ClassicalRegister, QuantumCircuit, execute,IBMQ

IBMQ.enable_account('INSERT TOKEN HERE')
provider = IBMQ.get_provider(hub='ibm-q')

q = QuantumRegister(2,'q')
c = ClassicalRegister(2,'c')

backend = provider.get_backend('ibmq_qasm_simulator')
print('Provider: ',backend)

#################### 00 ###########################
circuit = QuantumCircuit(q,c)

circuit.h(q[0]) # Hadamard gate applied to q0
circuit.cx(q[0],q[1]) # CNOT gate applied
circuit.cx(q[0],q[1])
circuit.h(q[0])

circuit.measure(q,c) # Qubits measured

job = execute(circuit, backend, shots=10)

print('Executing Job...\n')
result = job.result()
counts = result.get_counts(circuit)

print('RESULT: ',counts,'\n')

#################### 01 ###########################
circuit = QuantumCircuit(q,c)

circuit.h(q[0])
circuit.cx(q[0],q[1])
circuit.x(q[0]) # X-gate applied
circuit.cx(q[0],q[1])
circuit.h(q[0])

circuit.measure(q,c)

job = execute(circuit, backend, shots=10)

print('Executing Job...\n')
result = job.result()
counts = result.get_counts(circuit)

print('RESULT: ',counts,'\n')

#################### 10 ###########################
circuit = QuantumCircuit(q,c)

circuit.h(q[0])
circuit.cx(q[0],q[1])
circuit.z(q[0]) # Z-gate applied to q0
circuit.cx(q[0],q[1])
circuit.h(q[0])

circuit.measure(q,c)

job = execute(circuit, backend, shots=10)

print('Executing Job...\n')
result = job.result()
counts = result.get_counts(circuit)

print('RESULT: ',counts,'\n')

#################### 11 ###########################
circuit = QuantumCircuit(q,c)

circuit.h(q[0])
circuit.cx(q[0],q[1])
circuit.z(q[0]) # Z-gate applied
circuit.x(q[0]) # X-gate applied
circuit.cx(q[0],q[1])
circuit.h(q[0])

circuit.measure(q,c)

job = execute(circuit, backend, shots=10)

print('Executing Job...\n')
result = job.result()
counts = result.get_counts(circuit)

print('RESULT: ',counts,'\n')
print('Press any key to close')
input()
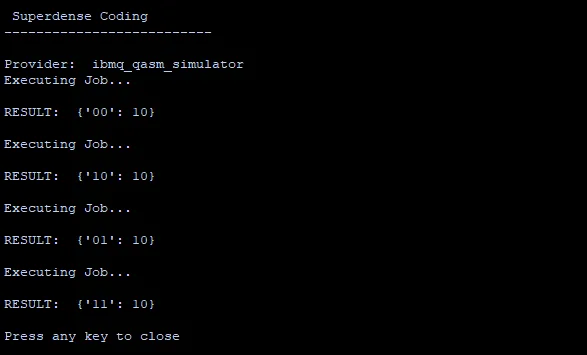
Output 🔗
After running the code you will see something like the following printed on the screen :
InteresteWant to learn about Quantum Programming? Head over to Quantum Computing UK.
For news on Quantum Computing head over to The Quantum Daily