In this quick tutorial, we’ll build a robust video (or music) streaming API using Node JS. Don’t worry, it’s surprisingly easy since we will be utilizing a modern protocol, HTTP Live Streaming, or HLS.
Why use HLS for video streaming? 🔗
HLS allows us to serve large media files as many smaller files. We will use a program to convert a single .mp3 file into several text files that can be served by a typical NodeJS file server. There are a few advantages to this:
- User’s video/song loads quickly
- The majority of unwatched or unlistened-to portions of the song won’t be downloaded
- We can use the familiar HTTP protocol, which means less server and client configuration
First Step - FFMPEG 🔗
FFmpeg will convert mp3 files to HLS format, which is really a bunch of files. The main HLS file is the .m3u8 file, and the URL that will be given to the streaming client will be the path to this file. This .m3u8 metadata file tells the client where to find each data (.ts) file. Data files typically contain small chunks of media data (~10 seconds) and are fetched at the client’s request as the user progresses through the song or video.
Let’s format some media.
Install FFmpeg. If you are on a Mac:
brew install ffmpeg
Navigate to the directory of the mp4 file and run FFMPEG:
ffmpeg -i sample-mp4-file.mp4 -profile:v baseline -level 3.0 -s 640x360 -start_number 0 -hls_time 10 -hls_list_size 0 -f hls index.m3u8
This will create some new files in the same directory:
index.m3u8
index0.ts
index1.ts
index2.ts
index3.ts
index4.ts
index5.ts
index6.ts
index7.ts
index8.ts
index9.ts
index10.ts
index11.ts
index12.ts
That’s the worst part! Now we just need to setup a Node server that can serve these files over HTTP.
Setting Up Node.JS 🔗
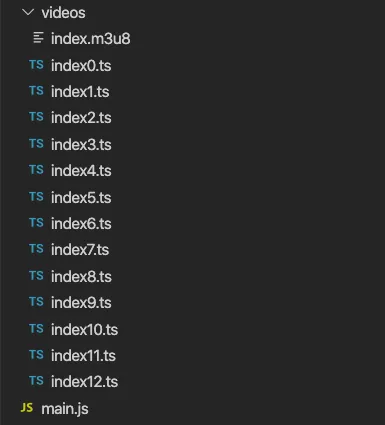
Let’s setup a project with the following folder structure:

main.js is in the root of the project along with the videos folder.
main.js should contain the following code:
var http = require('http');
var fs = require('fs');

const port = 8080

http.createServer(function (request, response) {
    console.log('request starting...');

    var filePath = '.' + request.url;

    fs.readFile(filePath, function(error, content) {
        response.writeHead(200, { 'Access-Control-Allow-Origin': '*' });
        if (error) {
            if(error.code == 'ENOENT'){
                fs.readFile('./404.html', function(error, content) {
                    response.end(content, 'utf-8');
                });
            }
            else {
                response.writeHead(500);
                response.end('Sorry, check with the site admin for error: '+error.code+' ..\n');
                response.end();
            }
        }
        else {
            response.end(content, 'utf-8');
        }
    });

}).listen(port);
console.log(`Server running at http://127.0.0.1:${port}/`);
Run your server:
node main.js
Then use this public tool to make stream your video to the browser.
All done! You can now stream video with Node.JS. The server we built is a very simple example, but you can serve these files in any way you want as long as its over HTTP. The thing that matters is that each path in index.m3u8 is consistent with the actual URLs of each data file.


